Pages
▼
Thursday, May 30, 2019
Eating Weeds: Dandelions
I was just asked on Facebook about eating dandelions.
The answer deserves it's own blog post, not just a reply to a comment.
Dandelions are one of those superfoods in every way. Every part of a dandelion is edible. My family doesn't eat the stems, because they take some preparation and can cause stomach upset. But the rest of it we do. Fortunately, when my children were little they blew lots of dandelions and my lawn is not chemically treated.
First thing: Make sure your dandelions come from places that are not treated with chemicals or close to busier roads with exhaust particulates that will fall on the dandelion. You don't want to eat those things.
Okay, have a safe place to harvest?
In the spring, young green leaf rosettes can be pulled up or cut off at the base. Rinse them, pat them dry, and fry them in a tempura batter for a nice treat.
Later in spring, start looking for buds close to the ground, the buds should be tightly closed and sort of squared off at the top. A tapering bud like formation is after blooming but before going to seed. A new bud tapers down to a rounded end at the stem and has a flat wide top in comparison to the base. (I'll post a picture here later). The buds can fermented like pickles to use as a substitute for capers. I have some fermenting now! You'll use a basic salt brine, plus seasonings you like. Mine have garlic, red pepper, onions and peppercorns in them. A basic salt brine is 2 Tablespoons of salt to 1 qt of water. Clean all your ingredients, chop your onions if you're using them, and put them in the brine. Weight it down using either specially made weights, a smaller jar full of brine or a small zip bag full of brine. Make sure all your vegetables are completely submerged. Put the top on the jar finger tip tight and put it in a warm but not too warm part of your house. Check every day to make sure that it's not building up too much pressure. You'll see bubbles forming, that's normal. If the button on the top of the jar won't press down, relieve the pressure by carefully opening it just a little. After two weeks, check the tartness and if it's where you want it, put it in the fridge to slow (not stop) the fermenting. Eat within a couple months. If you want it more sour, let it ferment longer. Watch for mold, but as long as everything is properly submerged, there shouldn't be any.
Also in spring, young leaves can be used in salads. They are delicious, and considered a bitter.
Dandelion blossoms can also be fried, made into jelly or made into wine. A quick internet search will turn up a lot of recipes for dandelion wine.
My Dandelion Jelly Recipe
My Fried Dandelion Recipe
You can rinse and freeze dandelion blossoms for later use in wines or jellies. Rinse, use a salad spinner to extract excess water or even squeeze it dry, freeze in single layers, then put in a labelled bag in your freezer to make the jelly when you have time.
For fried dandelion blossoms, any basic tempura batter works just fine though.
Older but not huge leaves can be boiled as any other vegetable, then used in soup. Discard the boiling water. Boiling helps get rid of some of the oxalates.
The bigger they get, the more bitter they get, so there is a point where you won't want to eat them.
The seeds can be collected, and threshing them lightly in a paper bag then using a fan to blow away the fluffs makes for a free seed that you can use to grow microgreens in the winter. Just sow as you would any other seed. They can also be sprouted, but I find microgreens a more effective use of time, plus if you miss some fluff, it won't matter with microgreens which you are cropping.
Dandelions are high in vitamins A, C, K and a good source of dietary fiber.
In the late fall, you can dig up the roots, cut them up and let them dry to hard, roast them either in the oven at 350 degrees Fahrenheit or toast them in a cast iron skillet. Store in an airtight jar. A decoction made by simmering the root in water makes a tasty non-caffeine coffee substitute.
More dandelions on this site include:
Dandelion Printable Recipe page
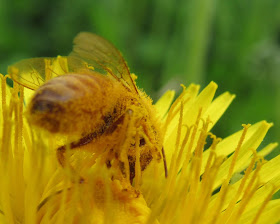
Dandelion and Bee coloring page
Dandelion Lined Paper Printable
Friday, May 17, 2019
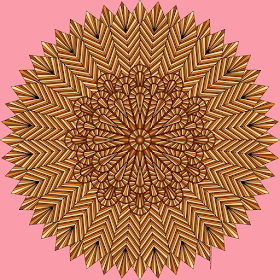
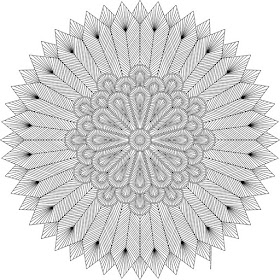
Feather Coloring Page- intricate!
I haven't done anything this intricate in a while. I hope you all enjoy it!! I'll be posting a less complex variation in the next few days.
This is inspired by those amazing beadwork wings that Billy Porter wore to the Met Gala event.
Click the images below for larger versions to print and color and sharpen your pencils!!
Small jpg version of feathers coloring page:
Large transparent png version of feathers coloring page:
Saturday, May 11, 2019
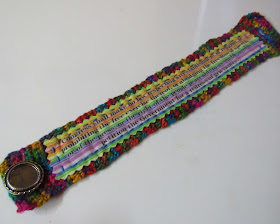
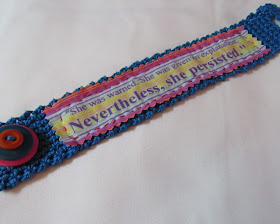
Soft statement bracelets- crochet and fabric tutorial
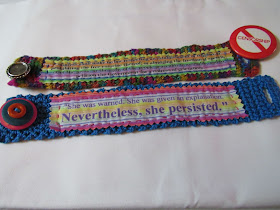
These bracelets are one of my new favorite projects. I like crocheted bracelets, Spoonflower fabric, and quotes.
The fabrics for these bracelets is available here- Bracelet Swatch Fabrics, a swatch is 5.00 USD and will make 5 bracelets, or you can use some of it as appliques. I'll be adding more quotes as time goes on. These are too much fun.
The first part is making your very own fabric.
You'll need a graphics program, a quote and an idea for how you want it to look. Remember that making it too busy makes it hard to read the quote. I love my 1st Amendment bracelet, but it's a lot of text on a rainbow background and very busy. Using a soft stroke outline on the text helps it stand out a bit.
Open an image 8 inches wide and 1.6 inches tall at 150 ppi minimum. Lay out your background and text, but remember it has to fit your wrist, so 6 inches wide and 1 inch tall for the text works well. Add graphics if you want, keeping them within the borders of what will fit your wrist when it's stitched into place.
Upload your design to Spoonflower. Set it up so the ppi matches the ppi of your design. Order a swatch. I used their woven cotton.
OR!! You can get really crafty and embroider your statement on fabric!
To make the bracelet:
You will need
- yarn
- appropriate sized hook
- button or buttons
- needle to weave in ends
- fabric
- pinking shears
- embroidery floss
- tapestry needle
Pick a yarn.
This is Darn Good Yarn Lace Weight Silk Yarn in Exotic Rainbow. It's gorgeous with really short color changes so it's very colorful even on small scale projects. The hand is very soft.
This is a basic size 3 crochet cotton thread. More structure than the silk, and it's a heavier weight so it works up quicker.
Yes, you can use worsted weight, that will be chunkier, but that's a neat look too.
Both bracelets are made close to the same way. Chain approximately 1.5 inches, single crochet a few rows, then you make your button hole. The button hole is made by figuring how big the button you're using is, and how many stitches across that is, then you subtract that number from the number in your base row, and divide that number by 2. sc that many stitches, chain the number of stitches for your hole, skip those stitches, and then sc to the end. So for the cotton bracelet, it was 8 stitches wide, and my button would fit into a 4 stitch hole.
8-4=4
4/2=2
Sc in first 2 stitches, chain 4, skip 4 stitch, sc in last 2 stitches, turn.
Then continue working back and forth until it's long enough to fit around your wrist with a 1 inch overlap. Break off, weave in ends.
For the silk, I used a size 0 steel hook and 11 stitches. For the cotton, I used a size D hook and 8 stitches.
The fabric needs to be washed, but because it's just a very small piece, I hand washed it and laid it flat to dry. Use the pinking shears to cut the strip and cut off the ends to fit on your bracelet. Press the fabric. Again, tiny piece. Rather than set up an ironing board and iron, I just used my daughter's hair straightening iron!
Stitch the strip into place. I used a running stitch. Starting it, I made a knot at the end of the thread with a few inches tail. Pulled it up through the fabric alone, then went down into both the fabric and the crocheted bracelet, then stitched around the entire patch. When I got to the end, I tied the thread off to the tail in a firm knot, then buried the ends in the crochet.
The button on the 1st Amendment bracelet is one from my mom's button box. The buttons on the Nevertheless bracelet are stacked inexpensive plastic buttons because I love how the colors pop that way.
The No Censorship pinback is from the early 90s. My family was advocating against a local measure and I still have several of them.
Saturday, May 4, 2019
SEED Lab- Repairing a very special box that was damaged in the earthquake
Anchorage Museum won a competition for a Public Art Challenge from Bloomberg Philanthropies. 5 cities got 1 million dollars each for the challenge. Ours is the SEED Lab.
"SEED Lab, a center to bring artists, designers, engineers and community members together to propose solutions to climate change and related challenges."Today, as part of their opening ceremonies, they had a community workshop for repairing things. There was a lot going on. Screen printing, rubber boot repair, repairing poetry, and the thing that caught my eye- repairing pottery.
In the earthquake, one of my mom's favorite boxes got it's lid broken. I saved the pieces, unsure what to do with them.
I was so happy to be repairing the piece that I didn't get the name of the woman who helped me. Whoops. Bad blogger!
But!! Also good blogger, because I'm going to explain how it was repaired!
This is what was there. They had a few pieces from thrift stores for people to break and learn how to repair using a method inspired by kintsugi- the Japanese art of repairing with gold.
This is the lid to my mom's box. 5 pieces, all there! Isn't that pretty and happy?
If you're going to try this- you'll need:
- 5 minute epoxy- double syringe type (available in any hardware department)
- Mica or Pearl Ex Powder Pigments (affiliate link - like these Jacquard Pearl Ex Powder Pigments 32 color set )
- something to mix the epoxy on- scrap of cardboard, disposable plate, etc
- craft sticks
- soft brush
- deep bowl or pan with uncooked rice to hold pieces
- rubbing alcohol
- cotton swabs
- craft knife
Now the disadvantage to this method is it's decorative only. Don't use it for anything that comes in contact with food. If you're using it for a fruit or candy bowl- line the bowl or use only wrapped candies.
Advantage- it will work with glass, color availability and it's very affordable and easy. You can also practice with thrifted pieces.
Figure out which edges you're going to put together first. Clean them with the alcohol and cotton swab to make sure no skin oils or dirt are on them.
Put a small amount of the epoxy on your mixing surface- about the size of a nickle. You'll only do a little bit at a time because of the short open working time of the epoxy when mixed.Mix in a very small amount of the pearl powder or mica- about 1/8th of a teaspoon.
Use the craft stick to spread a small amount on both edges you're connecting. Then line them up and press them together. A bit of the epoxy will ooze out. it's supposed to. Hold until they are tacky enough to hold together, put them into the rice to hold it. Make sure your glued seam isn't in the rice!
After a few minutes, about 3 or 4 on a warm day or about 6 on a cold day like today, use the brush to sweep some of the powder over the oozed seam of epoxy. Let it set a few more minutes.
In a couple hours, use the craft knife to clean up any blobs. I had to cut off a few blobs on the bottom so the lid would fit properly on the box.
Now with this piece, I did 2 sections of 2 pieces each. Also while I was working on it, we got a visitor to the table who was watching and asking questions! I told him the history of the piece. That my mom had brought it with her when she came up to Alaska as a VISTA volunteer. It's Anchorage's Mayor Ethan Berkowitz!! (see my lid in the rice behind him?)
The job I did wasn't perfectly neat, but it was, for me, perfectly right. When I showed it to William and TG (who were at a comic book convention and that's another post)- they were both very happy. They both said they want me to teach them this method to repair things. I'm glad they are happy with how it turned out. It's their history too.
They were also upcycling shirts with fantastic silkscreens by local artists. I had one put on the back of the jacket I was wearing that says "Seeding Change" (I'll get a photo later) and did this shirt that I know TG is going to "borrow" at some point with a gorgeous salmon print.
It was a very fun day.

