It looks like this, and it's available in all the usual places. Home Depot, Amazon, and it's 89 dollars USD.
So what makes it the perfect tool for hobbyists?
- It works with standard Dremel bits, grinders, burrs and collets
- Lots of power in a cordless that can be left on the charger until needed- it automatically stops charging when the battery is full.
- Light weight and ergonomic design is easy to hold and control
- TASK LIGHT! When it's in use, it has a little directed LED that shines right on the project to really see what you're doing.
- It does everything you expect from your Dremel Rotary tool, it drills, grinds, sands, sharpens, engraves and carves
In fact, the only thing that's not perfect about it in my family is that we have only one. We plan to remedy that soon. My daughter loves it for making hard wood knitting needles. She whittles down to the basic shape for the point, then uses a sanding drum to finish shaping for a nice taper. My husband thinks it's the best thing in the world with a small collet and drill bit to put nice neat holes in leather without having to line up punches. Using the 8050 Micro, he can mark where the holes need to be then zip zip zip and they are done. My son likes engraving glass.
It's designed to fit well into small areas, and to work on small projects.
Check out Dremel on Twitter, Facebook and Pinterest for lots of ideas and projects.
It's designed to fit well into small areas, and to work on small projects.
Check out Dremel on Twitter, Facebook and Pinterest for lots of ideas and projects.
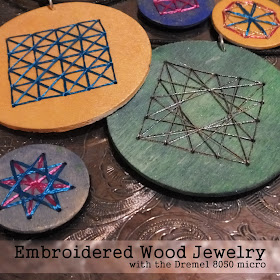
To make the jewelry shown, you'll need a Dremel 8050 Micro, a collet and 1/8th inch drill bit- both are available from Dremel, and if you want to bevel the edges, a sanding drum.
You will also need:
Wood disks, embroidery floss- this is a great use for specialty floss, paint, glue, needle to fit the floss, and jewelry findings.
This is a good project for craft nights and if you pre-drill, a fantastic project to do with children because there are so many ways to embroider designs and paint the disks.
Plan your holes. I went with a couple layouts for the small disks, and one layout for the large pendant disks- I made marks on one of the wood disks.
Then instead of marking each disk, I taped a few together- these are fairly thin disks of wood.
Then drilled the holes. So fast, so easy.
Now, you paint them. Remember to contrast the paint with the floss so the floss shows up well, and start stitching. The fun part is that the same hole layout can be used in different ways.
Spread a layer of glue on the back to seal all the knots and thread. You can back the disks with paper, felt or even another disk. Then attach all your findings. I'm going to glue the small ones to barrettes and ring blanks. The large ones are fun pendants.
Dremel wants to celebrate its fans’ brilliant projects, work and ideas! Now through October 12, share, tweet or post photos on Facebook, Twitter and Instagram that depict your brilliant ideas using the hashtag#MyBrilliantIdeaSweeps for the chance to win weekly prizes, including free tools and handmade gifts, or the grand prize: a custom-engraved Honda scooter and a Micro 8050. Visit www.facebook.com/dremel for rules and to learn more.
I was selected for this opportunity as a member of Clever Girls Collective and the content and opinions expressed here are all my own.


Cool project!
ReplyDeletelove this project. gives me so many ideas. I also love Dremels!
ReplyDeleteOh my gosh, I just posted something really similar yesterday using the Dremel, too! I shared a cross stitched wood door hanger, and I was checking out the campaign hashtag when I saw your jewelry (which looks amazing, by the way!). Great minds really do think alike! I'm definitely going to have to try jewelry next! :)
ReplyDeleteThat's so much fun! I did decopaged tissue paper on glass a couple of years ago that's a lot like your pretty fall leaf jars too! I love the effect of the leaves. Was it the children's version of the Book of Knowledge? We had a set it in our home when I was little, and loved the stories and the projects in it.
Delete