Pages

Friday, August 30, 2013

Tips for Left-handed Students with BIC Atlantis®

This is a Sponsored post written by me on behalf of BIC® for SocialSpark. All opinions are 100% mine.

My whole family is left-handed. Both kids, my husband and I are all lefties. 

So this means we adjust things to fit our style, and that I have some tips for lefties that I wrote down for my own kids. 

tips for lefties

You don't have to be left-handed to enjoy BIC Atlantis® pens. They are pretty wonderful, the ballpoint glides well, and the soft grip is easy to hold. They also come in great colors. Obviously my daughter loves the blue best! My own favorite is pink, and my son likes the black pens. They also have metal clips and look really nice too.

But why are they great pens for left-handers?

Tip 1: Pick a good ball point pen. One with a ball that moves easily and with ink that flows well and one that ink dries fast. A lot of left handers hold their pens in different ways, and some writing may wind up with your hand dragging across the paper which can smudge ink. 

Tip 2: Flip that notebook over and start from the back. Now, a lot of teachers won't want you handing in assignments that way, but some will let you. But you can absolutely take notes and make lists that way. Notebooks made for lefties can be expensive, but if you just flip over an inexpensive notebook you get that coil off your hand, wrist or arm. 

Tip 3: Try standard scissors. This seems counterintuitive, but a lot of scissors that are made now can be used with either hand, and a lot of the time, the standard scissors are sharper. There are a lot less options in left-handed scissors, so if you find a standard pair you can use, go for it. 

I wrote a note for my own kids. These are great for all sorts of projects and ideas. Writing notes to your kids to include in lunch boxes and bags, helping to keep track of things you need to do. If you were going to write some tips for your favorite students, what would they be? Pick up BIC Alantis® pens while you're doing your back to school shopping to express yourself. Expression is the point, and BIC® has a great giveaway going with lots of instant win prizes. Even if you don't win, you get a coupon, so it's still a win!

BIC Back-to-School Instant Win

No Purch Nec. U.S. only. 18+. Ends 9/2/13 so go enter!

Visit Sponsor's Site

Thursday, August 29, 2013

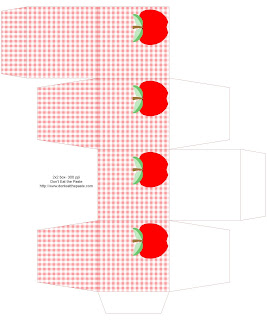
2 more apple boxes- 2x2x2 cubes


The gingham box is actually the afterthought this time. This pair of free printable boxes is because of a special request from OMazing Kids, who after seeing the stained glass apple box asked if I could make one that could be colored. She plans to use it for "toega", having kids color the apples to match pom poms, and sort the pom poms with their toes into the boxes. (I remember doing something similar with marbles and wine bottles when I was younger.)

Click on the images for larger versions. Print on card stock, cut out, score folds, fold and glue!

Coloring version:
apple box to print, color and make

Gingham box:
apple and gingham box to print and make

Saturday, August 24, 2013

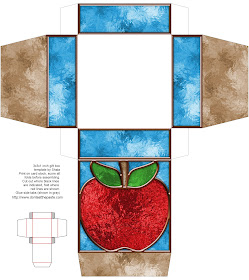
Printable Apple Box


I hope you enjoy this printable stained glass effect gift box. It's an apple, which is good for back to school, autumn or fairy tales! Click on the image for a larger version, print on cardstock, cut, score folds, fold, glue!


Printable stained glass effect gift box

Thursday, August 22, 2013

Chinese replica coin soft bangle- crochet pattern


I love making soft bangles, and have a few patterns for them available.

This one is done in a single crochet strip with the coins worked into the crochet fabric, then seamed up one side.

You will need:

  • 8 17 mm Chinese replica coins- available from Fire Mountain Gems
  • Size 3 crochet cotton thread- I used Aunt Lydia's Warm Teal
  • Size D (3.25 mm) hook
  • Tapestry needle- large enough for the thread to weave in ends
  • scissors
Pattern in American terminology

Abbreviations:
  • sc= single crochet
  • ch= chain
Start by stringing on 8 coins. If you have larger hands/wrists, do 9 coins, for smaller hands/wrists- 7 coins.

Ch 5
Row 1: Ch 1 to turn, sc in each stitch (5 stitches)
Row 2: Ch 1 to turn, sc in first 2 stitches, insert hook in the next stitch, and yarn over, pull through stitch (2 loops on hook) push 1 coin up, yarn over around the coin, and pull through both loops, sc in next 2 stitches,
Row 3-5: ch 1 to turn, sc in each stitch across
Row 6: Ch 1 to turn, sc in first 2 stitches, insert hook in next stitch and through the middle of the coin, yarn over, pull through the coin and the stitch from the previous row (2 loops on hook), yarn over, pull through both loops, sc in next 2 stitches.

Repeat rows 1-6 until you've used up all the coins. Break off thread, and sew edges of strip together, then weave in the ends. 

This will work with other doughnut shaped pieces but you'll have to adjust for the size. Just remember that it needs to be an odd number of rows between the coins, and behind the coins. In this case, it's one row between each coin, and 3 rows behind the coins.


Wednesday, August 21, 2013

Duck Tape® Index Card Case Tutorial

This is a Sponsored post written by me on behalf of Walmart for SocialSpark. All opinions are 100% mine.

Duck Tape index card case

You expected cute little owls maybe? *grins* I actually thought about it and you can absolutely find my Retro Owls tape when you go to buy Duck Tape at Walmart. But there are so many prints available from Duck Tape®, lots of licensed prints including Mickey Mouse, 1 Direction, Despicable Me and the Avengers, plus a lot of their own designs (and Retro Owls! yeah, that's still amazingly cool to me) ... well, my family are pretty serious comic book geeks. So AVENGERS ASSEMBLE! (I think that's out of my system now)

You will need:

  • Duck Tape®
  • Non-stick scissors- I recommend Westcot
  • hook and loop dots, squares or tabs - I used Velcro
  • Index cards

Start by making a Duck Tape® sheet- I do my work on an old room service tray, but a self-healing cutting mat works too. It just needs to be a surface that won't be damaged by the tape and that you can pull the tape off.  Just put down a strip sticky side up, then another strip over it sticky side down, and flip back and forth until the sheet is big enough. Make it a bit wider than the index cards so you can trim down to nice neat sides.Duck tape card case tutorial- making the sheet

Make the sheet twice as long as the cards are tall, plus a couple inches for the flap. In the photo below, I've already folded it up and placed a card over it so you could see the flap length. I've also trimmed the sides. Leave a little bit of room for the depth of the cards- at least a quarter inch.

Duck Tape card case tutorial

Rub all the folds with the scissor handles to crease them well.

A lot of tapes are directional. Like Retro Owls has the design horizontally aligned. Avengers is vertically aligned. Alignment  will help you decide your decoration. In this case, I decided on a band down the center.

Duck Tape index card case

Because it would be upside down on the back if I wrapped it, I cut it off. It's folded over at the top and bottom.

Then lined up the design for the top flap. 

lining up the design with Duck Tape

See how pretty that's lined up?

lining up the design with Duck Tape

Now it's time to finish it up. Start by putting tape on the back. I picked a contrast color, but you could use the same color you used for the base color. Leave a small amount to fold over the front.

taping it up

Duck tape index card case

Repeat on the top, and put a piece of tape in the middle where the gap shows.

Duck Tape card case tutorial

Duck Tape card case tutorial

Then cut short lengths to tape up the sides, most of the tape will be on the back to create the bordered look for the front.

taping up the case

Repeat on the flap, then put another piece of tape on the back of the flap for the last border piece.

taping up the case

Now it's time to add the hook and loop closure. To get it to line up perfectly, take the backing off one side, then press it down to the flap. You can either put one in the middle, or do what I did and use 2.

Velcro on Duck Tape

Take the backing off the other side, and press it down to close it. The sticky will stick in the right place!

Velcro on Duck Tape

Duck Tape® comes in so many prints and colors that it can be used to personalize all sorts of things for school. You could tape up a 3 ring binder to match this card case, make a pencil case in a similar style, use it to show your personal style. It comes in enough colors that it's also possible to show your school spirit with Duck Tape®.

Plus, Retro Owls! Which I didn't actually show in this post. But thank you all for telling me where you are finding it and what you are doing with it. If you want to email me pictures, I'd love to do a photo post of all the really neat things people are doing with Retro Owls Duck Tape®.

Follow @TheDuckBrand for lots of great ideas.


Visit Sponsor's Site

Sunday, August 18, 2013

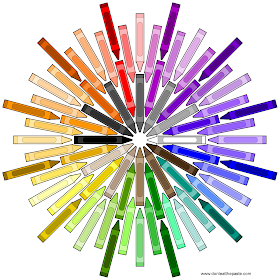
Crayon Mandala to color

Crayon Mandala

All the back to school supplies in stores, inexpensive colored pencils, 10 cent boxes of crayons etc, inspired this mandala. I hope you enjoy it!

Click the images for larger versions.
Small JPG version:
Crayon mandala to color (jpg format)

Large transparent PNG version:
Crayon mandala to color (transparent PNG format)


Saturday, August 17, 2013

National Can-It-Forward Day- giveaway!


National Can-It-Forward Day is winding down. But the fun doesn't have to stop. Ball has lots of links, recipes and videos posted year round.

What did we do? More jellies! We have lots of friends who can, and have exchanges with them, I really recommend it. Find out who cans, or who you know who has an interest in it. What they grow, what they might want to can and preserve will be different from what you want to do. It's a fun way to try all sorts of things. For example, one of my best friends does amazing mixed fruit jams, but doesn't do salsa or pickles. I grow cilantro and dill for canning salsas and green beans. So we swap, and return each other's jars filled with new things.
You can find my son's favorite pickled pepper recipe HERE.

Ball is sponsoring giveaways on a whole bunch of blogs, including mine! The idea is to get more people enthused about canning.

This giveaway is open to US residents only.
This is the the Ball Canning Discovery Kit. The basket is made of polypropylene which works just fine at boiling temps and will hold 3 pint jars easily. It fits into your lidded stock pot for hot water bath canning and comes with jars and a basic how to can booklet. I have one, and use it regularly. Ball sent me a second one for this year's Can It Forward Day, and it belongs to my daughter who wanted her own set. Perfect for small batch canning, or for beginners who want to start with small batches. 


Ball Blue Book Guide to Preserving- Beyond just canning, this also covers dehydrating and freezing food to preserve it. Essential for the beginning canner, and a helpful reference for people who have been canning a while. This is updated regularly for the very newest information on safe canning, has lots of full color photos and clear explanations on how to can, and instructions and recipes for almost everything the home canner needs. I have several years worth of Ball's Blue Book and recommend it. The recipe for the rhubarb above was done from this book by my daughter who has never canned before this year.
(Want cute rhubarb labels? Look here!)

The other part of the prize package is a coupon good for 1 case of jars, which come with lids and bands. , Ball jars have been the standard for home canning for as long as I remember. They are uniform, easy to find replacement bands and lids for, they are great quality, and will last for years. The compound on the lids seals effectively and easily.


a Rafflecopter giveaway

Ball Canning provided the products reviewed for me free of charge. There was no other compensation, and this is my honest opinion of the products. And my daughter made jam, jelly and preserves by herself and has the canning bug in a big way. This morning I got to enjoy fruit punch jelly on toast and it was fantastic!

National Can-It-Forward Day!

It's National Can-It-Forward Day! A great day to learn how to can and talk to other people about canning.

Ball®'s  FreshPreserving.com  is having all day webcasts, there is a Twitter event going on (#CanItForward) and other ways to participate.

Can-It-Forward TV

Here's the webcast schedule- there will be chances to win giveaways as well as all the great things you'll learn!

Broadcast Schedule:

10:00am-10:45am: Jam making and water bath canning demo by Jessica Piper
10:45am-11:00am: Craft Corner with Jordan DeFrank
11:00am-11:45am: Pickles Demo by Rick Fields 
11:45am-12:00pm: Craft Corner with Jordan DeFrank
12:00pm-1:00pm: Special Guest Host Ted Allen canning and cooking demo
1:00pm-1:15pm: Cocktails in Ball Jars hosted by Mason Jar NYC Restaurant
1:15pm-2:00pm: Jam making and water bath canning demo by Jessica Piper (repeated)


Friday, August 16, 2013

3rd National Can It Forward Day- Super Easy Jelly Making

Tomorrow is National Can-It-Forward Day! YAY! A lot of my readers are enthusiastic canners, and a lot have never canned before. Tomorrow I'll be posting video links AND a giveaway! Be sure to come back for that.

My daughter, before this year, had never canned before. She enjoys homemade jellies and jams made by me, and by some of our family friends. But it was kind of intimidating for her. Part of National Can-It-Forward is encouraging people to try it.

Ball® sent me a current Ball® Blue Book, a Ball® Home Canning Discovery Kit, a case of the gorgeous Heritage blue jars, labels, pectin and a  Ball® FreshTech Automatic Jam and Jelly Maker free for review purposes. The Ball Blue Book and Canning Discovery Kit are reviewed here.

So why can your own jelly and jams? Well, the most obvious answer is that if you grow berries and other things, you may want to preserve your harvest to enjoy through the winter. But even if you don't, there are still good reasons to can. You have absolute control over the ingredients. You can pick the flavors and types of things you want to can, your home canned goods won't contain high fructose corn syrup or other ingredients that are used to cut costs commercially. You can save money by canning too. The jars and bands are reusable. The only thing you need to replace every time is the lids themselves. That's because the compound on them to seal your jars is one use only.


All of those were made by The Amazing Turnip Girl. From left to right are stewed rhubarb (rhubarb from our garden), raspberries (also from our garden, and jelly made from store bought juice.

Yes. Store bought juice. Because jelly making can be ridiculously easy. So easy you'll wonder why you ever bought jelly. She used the FreshTech Jam and Jelly Maker to make everything but the rhubarb. 


Using the FreshTech Automatic Jam and Jelly Maker, you can go from fruit juice, pectin and sugar to jelly in a half hour in only a few steps. You add your juice and pectin, then when it beeps, add in sugar. It will make 4 cups of jelly at a time. So you can make 1 pint jars, 4 half pints, or 8 little 4 ounce jars to give as gifts. It has a non-stick surface and cleans easily. It got TG's seal of approval, she's just thrilled with it. Use your favorite 100% juice, it can be made from concentrate, or canned juice. She chose Juicy Juice Fruit Punch for her first jelly. 
You can freeze or can the jelly to preserve it. For my family, we go through about a pint a month.  Because this is so easy, with no standing and stirring time, I asked her if she wanted to make jelly regularly that way. She said "Oh yes!" and started considering other juice flavors. 
So I broke out my pencil and paper and worked out the cost. Remember, Alaska is a little more expensive than that lower 48 states, so chances are good you can make your own jelly even more thriftily.

The recipe in the included booklet calls for 3 cups of juice, 4 tablespoons of pectin, 3 1/3 cups of sugar and a 1/2 tsp of butter. 
Costs are rounded up.
Bottle juice at 4 dollars a bottle- 64 ounces= .0625 per ounce, a cup is 8 ozs, 3 cups is 24 oz= 1.50
Sugar- 4 lb bag is 3.49, 8 cups per bag- .44 cents per cup = 1.45
Jar of Flex-batch Real Fruit Classic Pectin is 4.49 regular price (it's on sale this week at my local Fred Meyer for 3.69)- One jar will make 4 batches-  1.13 per batch
Butter= .20 per tablespoon

So at premium prices for the sugar and juice instead of buying frozen concentrates or canned juice, and getting a name brand juice- it's 4.28 to make 32 oz of jelly! Can't beat that for something you know is the flavor you want and made without high fructose corn syrup or any of the other things that might be hiding in a jar of store bought jelly. You can make savory jellies to use as glazes. 

If you've ever made jelly the old-fashioned way, with the mashing, milling, straining, standing, cooking, etc, you can appreciate that it's a wonderful way to make jelly, but it's time consuming. Using fruit juice will cut a lot of time from it. 

When I mentioned it on Facebook, how much fun she was having making jelly- my friends came up with a whole bunch of suggestions including seasoned cider jellies to use on pork, pom/cran for poultry, and cranberry to use with cream cheese for the best ever turkey sandwiches. 

So did we like the FreshTech Automatic Jam and Jelly Maker? Absolutely. We are planning to put up a lot more batches of jelly, and she's looking forward to giving some of her friends jelly. Now, mine turned out super easy because I didn't have to do even open a bottle of juice. But that's because TG took over very enthusiastically. Your experience probably won't be quite that easy, but it will still be easy. 

I recommend it to people who haven't made jams or jellies before because it's so easy for small batches, but I also really recommend it for people like me who just can't stand to stir anymore. It takes a lot of the standing time out of the process. 

Thursday, August 15, 2013

Quick, easy, delicious with Kraft and DG

This post brought to you by Dollar General. All opinions are 100% mine.

Did you know that you can find KRAFT products at Dollar General? All the ones you know and love and possibly some you haven't tried yet. 

I'd like to say that I cook dinner completely from scratch every night, but it doesn't actually work out that way. Life gets busy. So my family takes turns cooking, and also uses some prepared foods for meals. KRAFT Salad Dressings are a big one, as marinades, to mix into dips, or even occasionally as a salad dressing. There is a recipe for a very easy KRAFT Creamy Ranch dip on the Dollar General site that tastes fantastic with carrots and dips are a great way to get almost anyone to eat vegetables. 
For fast to make menu planning for busy evenings, Dollar General has a lot of recipes. Since a lot of the ingredients are shelf stable, you can stock up and be ready for those busy days when nobody has time for cooking. I've found knowing there are quick meal solutions available helps keep my family from eating fast food as often, and even if it's a quick meal, we still get to sit down together. 

My favorite recipe on the Dollar General site?  The Frosty Strawberry Pops- They are sweet, easy, cold and my family likes them, and they have a lot of vitamin C in them! 

Favorite product? PLANTERS nuts. Hands down, they are fantastic, in the cans or in single serving packs. These get packed along with CAPRI SUN for hikes, long drives (Alaska State Fair is next week, and that's a 2 hour drive with the traffic!), and all sorts of things. You might not be able to bring nuts to school, but you can bring them everywhere else if you aren't allergic. 

Dollar General has coupons, recipes and ideas to simplify those busy, busy days.


Visit Sponsor's Site

Wednesday, August 14, 2013

Multicolored all occasion dotty gift boxes


Is this really the first set of printable boxes I've posted this month? It's been a busy month. Sorry about that!

Anyway, I hope you enjoy this box set, there are 3 color combinations for it!

Click the images for larger versions to print, print at 8x10 inches on cardstock, cut out, score, fold, glue!


Tuesday, August 13, 2013

Diamond Candles review and giveaway


Diamond Candles recently asked me if I'd be willing to do a review of their candles, with a giveaway for Don't Eat the Paste readers. I love candles. They don't need a special surprise for me to love them, candle light, and a nice scent is going to be enough. The surprise though? That's kind of like being a kid with a box of cereal and a toy surprise except better. All the photos in the collection above were taken by me.

They sent me a code to get a free candle for the review. I talked to my daughter, and she chose Cupcake scent. The candles are soy candles, which mean very little soot, and a nice clean burn. Plus soy candles can handle a heavier fragrance load than standard paraffin candles and are more environmental friendly. Because soy is a soft wax, it's perfect for container candles.

The candle itself- it has a warm, baked vanilla sugar scent. Nothing too sweet, it's more grown up than that. A very homey scent, with a great throw (how far the fragrance travels while the candle is burning). I could smell this one from 12 feet away. Not a strong smack you in the face scent like room spray can be. Just comfortable.

The container- Diamond Candles has a Pinterest board of craft ideas for empty containers. The containers are very nice. All glass with a label that can be removed with a bit of work and a tight fitting lid. Their fans buy candles regularly enough that some have had some very clever ideas for re-use. Mine will probably wind up on either my Dad's or husband's desk at work holding wrapped candy or small things they need at their jobs. They can also be repurposed to hold things like cotton swabs and such in a bathroom, decorated all sorts of ways.

The ring- Were you one of those people who dumped out the whole box of cereal to get to the toy surprise? Or did you patiently serve up bowls waiting to get to it? There are people who just can't wait and dig for the ring. It's placement is marked with a foil disk on the inside of the container. You can also just let the candle burn. We opted to let it burn. Soy wax has a fairly low melt temperature, so when it got down far enough, I pulled the little foil pack with a pair of long tweezers. The ring is in a zip baggie wrapped in foil and won't be all encrusted with wax.

They have rings worth anywhere from 10-5000 dollars in the candles. Obviously, most of them will be fashion rings worth about 10 dollars retail, but there are more expensive rings put in at random. The company would rather spend advertising money that way then on lots of ads. It works for them, they have a trading post where people can trade for the rings they would prefer, or trade with other people who got rings too big or too small. I'm not trading the ring I got, it was a 10 dollar fashion ring, but it just happens to be just the right size for my daughter, and it's her birthstone.

It's a lot of fun! I already have the coupon code for the winner to get one free candle. So go enter! Part of entering is liking Diamond Candles on Facebook and they also have regular giveaways there for their candles.

 a Rafflecopter giveaway

[The product reviewed was provided to me at no cost for the purposes of review. I received no other compensation, and my review is my honest opinion of the product.]

Monday, August 12, 2013

Printable quote- Do not spoil what you have - Epicurus

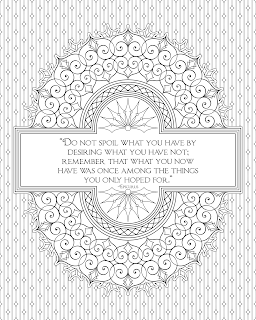
Do not spoil what you have - Epicurus quote
“Do not spoil what you have by desiring what you have not; remember that what you now have was once among the things you only hoped for.”
Epicurus

I really like this quote, and since there hasn't been a printable quote in a while, I hope you enjoy it too. The small version above is on my Facebook page if you'd like to share it.

Click the version below for a larger version to print. I'm still loving Astrobrights paper for black and white quotes. The printable version doesn't have the URL in it and is designed to print at 8x10 inches.

Printable quotes- things you only hoped for- Epicurus


Saturday, August 10, 2013

Small Crocheted Sachet Pattern

Crocheted small sachet


This sachet is very quick to stitch up, and because it's only lightly stuffed, stuffing with fabric scraps works out well to make it all cotton and completely machine washable if you decide to scent the cotton with essential or fragrance oils instead of putting plant matter into the stuffing.

If you use plant matter, it's better not to wash it, or to wash it by hand and make sure it's completely dry before stashing it anywhere. I like using lavender buds to scent these, and as the scent fades, adding lavender e.o for more scent. But in humid areas, plant material can start to decompose which makes essential oils a much better choice.

Finished size using size 10 crochet thread- just under 2.5 inches in diameter.
You will need:

  • Size 6 steel crochet hook (1.6 mm)
  • Size 10 crochet cotton thread
  • cotton fabric- 5x5 inch piece (makes the fabric middle including stuffing)
  • sewing thread
  • sewing needle
  • tapestry needle to weave in size 10 thread
  • scissors- regular thread snips and pinking shears
Stitches used:
  • sc= single crochet
  • ch= chain stitch
  • sl st= slip stitch
  • dc= double crochet
  • repeat ** means repeat the instructions between the asterisks
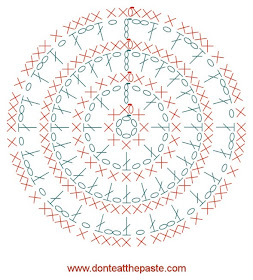
Pattern written in USA terminology- there is also an international crochet chart this time!

Make 2-
Medallions:
Ch 6, sl st to make ring.
Round 1: Ch 1 (does not count as first stitch), 8 sc in ring, sl st to first sc to join.
Round 2: Ch 5, *dc in next stitch, ch 2*, repeat ** around, then sl st to 3rd st in starting chain to join (8 spaces formed)
Round 3: Ch 1 (does not count as first stitch), sc in each stitch around, sl st to first sc to join (24 stitches)
Round 4: Ch 4 (counts as first dc and ch), *dc in next st, ch 1*, repeat ** around, sl st to 3rd ch in starting ch to join. (24 spaces)
Round 5: Ch 1 (does not count as first stitch), sc in each stitch around, sl st to first sc to join (48 stitches)
Round 6: Ch 4 (counts as first dc and ch), skip stitch, dc in next st, ch 2, *skip stitch, dc in next st, ch 1, skip stitch, dc in next st, ch 2*, repeat ** around, sl st in 3rd ch in starting ch to join. (24 spaces) 
Round 7: Ch 1 (does not count as first stitch), sc in each stitch around, sl st to first sc to join (60 stitches)
Break off thread.

With fabric:
Cut 2 circles 2 inches in diameter with the pinking shears. Hand sew 3/4s of the way around the fabric with wrong sides facing each other. Cut small strips of the remaining fabric and lightly stuff. You can also put in any aromatics at this point. Finish sewing around. 

Final round of crochet- with the 2 medallions together working over the tail ends to conceal them, join in thread, and single crochet them together. When they are halfway joined, slip in the little fabric pillow and finish single crochet around. Slip stitch to join. Chain 15, and slip stitch in next stitch, then slip stitch back up the chain 15, and slip stitch to join. Break off and weave in tail.

The medallions:
crochet chart for small sachet

Joining edge:


Thursday, August 8, 2013

When it rains, it molds- Allergy Face™ tips from Zyrtec®

This is a Sponsored post written by me on behalf of Zyrtec for SocialSpark. All opinions are 100% mine.

My daughter and I both suffer from allergies. In her case, it's pollen. The kind of pollen that becomes a problem when everything is in bloom and we are doing a lot of outdoor activities on warm summer days. A slight breeze causes a lot of sneezing and sniffling.

For me,it's mold. A breezy evening after a few days of gentle rain and I'm wrecked. My eyes redden and tear up, I sneeze. Then I can't see, and my glasses are usually a mess from trying to wipe my eyes without taking them off. 

Taking Zyrtec before it becomes an issue works well, but if it snuck up on you, Zyrtec also works fast. That's why we use it. We can take it, then go out bird watching, hiking or just taking care of the garden. Zyrtec helps you feel better, but they also have great allergy face beauty tips to help you look better. 

This infographic shows some of the things people do to cover up their Allergy Face. I have a pair of prescription sunglasses I'll wear even on dark fall nights! Once I'm not tearing up, and recovering from the sneezing, etc, a coat of black mascara on my top lashes only helps my eyes look a bit more open. My daughter goes with letting her hair fall over her face to cover her red nose when she's been sneezing. 

What do you do to help cover up or deal with allergy face? Any go-to tips? Leave a comment, I want your ideas!

Next time I'm going to try these beauty tips! I like the idea of the black and gold eyeliner, and I think I'll need it for the State Fair this year. My husband and I get to meet one of the bands playing.

Check out Zyrtec on Facebook for more ideas and information on dealing with allergies.


Visit Sponsor's Site

Wednesday, August 7, 2013

August Birthstone and Flower Mandala

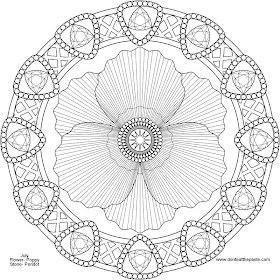
Poppy and peridot mandala for August

Happy Birthday to everyone born in August!

August is poppies and peridot. I love the alliteration and the light olive green of peridot makes it one of my favorite stones. This is probably one of my favorite mandalas to color so far in the series. Poppies come in so many gorgeous colors.

You can find the rest of the mandalas in this series here-
The Birthstone and Flower series of Mandalas

Click the images for larger versions to print and color!

Small JPG version:
August mandala- poppy and peridot to print and color - jpg version

Large PNG version:
August mandala- poppy and peridot to print and color - png version


I usually link to a gift idea or two. This time, instead of something with a poppy theme, it's one of my favorite glitters. Love this stuff.
Usual disclosure- when you buy something from Amazon using my links, I make a small commission. That commission helps support this site and my book habit.