Pages
Monday, July 30, 2012
Rainbow Colored Printable Favor Boxes
It's raining today! So today's printable is a pair of rainbow colored boxes. I hope you like them!
Click on the images for larger version. Print on card stock, cut, score, fold, glue!
Sugar Free Mocha Cafe Pudding using Nectresse™
I've tried a lot of sweetners in making sugar free desserts for loved ones on sugar restricted diets. This new sweetener by the same people who make Splenda is a new favorite.
NECTRESSE™Sweetener-
It's the only no-sugar, no-calorie 100% natural sweetener made from monk fruit, it's available very reasonably priced at your local supermarket. 1 packet is the equivalent of 2 tsps of sugar in sweetness.
I tried it first in a cup of coffee to see how it tasted. I was pleasantly surprised. There is no bitterness to it, and tastes natural. The rest of my family also tried it, and my husband and daughter both really liked it.
So after talking it over with my daughter, we decided to try making pudding. I asked her if it should be a chocolate or vanilla pudding, then realized what a very silly question that was right after asking. She thinks the world should be chocolate flavored.

Sugar Free Cafe Mocha Pudding-
Ingredients:
- 2 cups milk
- 1/4 cup unsweetened cocoa
- 2 Tbsp instant espress
- 1/4 tsp salt
- 1 tsp. vanilla extract
- 2 Tbsp corn starch
- 7 packets NECTRESSE™Sweetener
- Large sauce pan
- whisk
- spoon
- bowl
Bring the milk and cocoa mix to a simmer over a low heat, whisking as you cook to mix in the cocoa and other flavorings well. When it's bubbling and everything is mixed in, pour in the milk and corn starch mix, whisking constantly. Keep whisking, it will soon come back up to a bubble.
Keep whisking, and it starts to thicken. Homemade cooked puddings are so good. This is the point my daughter told me "It smells good!"
When it's nice, thick and glossy, take it off the heat and put it in the fridge with plastic wrap over it to keep it from forming a skin. Makes 4 half cup servings. Serve after it's chilled.
I recommend topping with whipped cream. Unsweetened and lightly flavored with vanilla.
Click here to try a FREE sample of NECTRESSE™Sweetener
I liked cooking with this, the pudding turned out good and my family who aren't on sugar restricted diets all enjoyed it. One of the things I liked best about it was that it doesn't foam up like some sweeteners do.
Check out what Lisa Ling has to say about it!
Saturday, July 28, 2012
Shopping at Garage Sales
Some tips on walking around for garage sales:
- Wear comfortable shoes and socks. Seriously, I have a blister on the bottom of my foot.
- Bring cash, in singles and fives
- Bring a bag!
- Dicker! Part of the fun of garage sales is dickering. Remember, people want to get rid of the stuff, and are usually willing to dicker.
- Carry a list of sizes for people in your family- I do this anyway because I'm the primary clothing/shoe buyer for my whole family, and you never know when you're going to find a great deal on something just right.
- Think seasonally- just because it's 75 degrees out, if you live in Alaska, at some point, you're going to need sweaters.
- Look at crafty possibilities
- Don't buy just because it's a great price.
- If you see something you just can't carry home but you have to have, ask if they are willing to hold it for you.
When it was all over, we had walked about 2.5 miles, got some good exercise and had a lot of fun together. We stopped at the coffee stand by our house on the way home, where a bikini clad barista made us perfect iced lattes.
Friday, July 27, 2012
Laurel wreath and medal coloring page
Small JPG version:
Large transparent PNG version:
Wednesday, July 25, 2012
I love books!
I love books and love to read. I have my nose in a book or would the modern equivalent be "my eyes on the screen" regularly. You know that I review mostly craft, cooking and beading books. It doesn't mean I don't read fiction too. Today I ordered this fantastic book themed shirt* from the Threadless 9.99 sale.*
"Books are a uniquely portable magic" -Stephen KingHere's the quote art if you want to print it, click on the image for the larger version and print on landscape settings. The version above is printed on Astrobrights paper, and as usual, there is a share version on Don't Eat the Paste Quotes.
Tuesday, July 24, 2012
Book Review: Grow Your Handmade Business
Where The Handmade Marketplace focused on marketing your designs and projects for sale, this book focuses on how to build a business. It's a good book for anyone who feels overwhelmed when they start thinking about going professional to sell their goods.
You wouldn't expect a reference about business to be engaging, this is engaging and informative. Since the author really loves the DIY/handmade movement, that passion shows. There are lots of contributors who add their own stories and how to apply those tricks to your own business. I actually read the book cover to cover while sitting in my yard in an afternoon.
She does a wonderful job of explaining how to write a business plan that you can present to banks for loans. It becomes a lot less scary when you see it laid out in a friendly, conversational tone. She explains it in detail in easy to understand language.
She also has a section on choosing mentors. It defines different kinds of mentors. It also explains a bit about the mentoring process and how to find one through your local SBA. How to approach someone as a possible mentor and what to do if your are approached.
The section on plans and goals also explains how to manage them so you can handle them without being overwhelmed. Your plan and goals can be as flexible as you want them to be following her tips. The idea of setting an objective to reach and then making goals that are achievable to reach that objective is a good tip for business and for life.
A chapter on profit and loss explains with tabled examples and clear language how to create profit and loss statements to work out how well your business is doing.
There are a lot more things covered in this book, how to visualize exactly where you want your business to be in the future. It also explains some of the warning signs you might be on the wrong track. Personally anecdotes serve as examples and illustrations of the methods explained.
If you're ready to start growing your crafty business, but don't know where to start, I recommend this book. It's very easy to read and understand, and full of information. It breaks things down into easy to handle steps so it's not so overwhelming. While the focus is on creative businesses, the techniques, tips and information apply well to most small businesses.
Published by Storey Publishing.
I received a complimentary copy of this book to review, my reviews are always my personal and honest opinion. You can read more about my review policy here.
Printable peace symbol boxes- 2x2x2 inch cubes
Click on the images for large versions, then print on card stock, cut, score, fold, glue!
Sunday, July 22, 2012
I got my new glasses!
I got my new glasses!
Usually I like buying my glasses in person, like most people, to be able to try on different pairs. But ordering online is a lot less expensive.
I've ordered from ZenniOptical before, this time I wanted to try a different company. After doing some research, I picked EyeBuyDirect. If you decide to buy a pair of glasses from them after reading this, please use this code for a discount: IFF2MRR81T They have a loyalty program, and if you use the code, you'll get a discount, and I'll get a small credit on my next order.
Reasons for picking them:
- Cost. They are on par with ZenniOptical for some complete pairs
- Style- They have nice styles, especially in the retro glasses my husband prefers- He rocks the Clark Kent look.
- They take PayPal. If you're an Etsy craft seller, work with sponsored posts, etc, you know PayPal is the currency of the land. The fact they take PayPal made them incredibly convenient.
Some tips for hand sewing dolls
 |
| Swatch Dolls- my design on Spoonflower printed Kona cotton. You can find the swatches for sale here. |
 |
| Sherlock Holmes- Designed by The Amazing Turnip Girl |
My daughter likes regular, old fashioned polyester fill stuffings. You know the kind that look like a big cotton ball that you pull off bits of to stuff? She likes it because it stuffs more firmly, and it's neat and tidy to use it so she doesn't wind up with lots of stuffing bits on her bed where she sews. It's easy to wash and dry.
Cotton batting has the advantage of being easily cold water washable and you can scent it easily with fragrance oils. It's a good choice for something like sachet type dolls that can be scented and put in a lingerie drawer or scented pin dolls.
Saturday, July 21, 2012
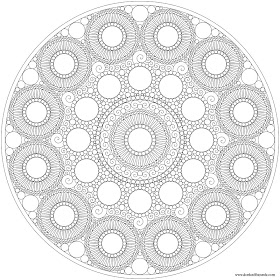
Etruscan Inspired Mandala to Color
Friday, July 20, 2012
Birds, Trains and Raspberries- Photo Post
 |
| Alaska Railroad Train |
 |
| Strawberries in my yard |
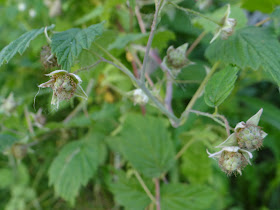 |
| Raspberries in my yard |
 |
| Arctic Tern-Shala Kerrigan, Potter's Marsh, Anchorage |
 |
| Taken by Michael Simbeck at Potter's Marsh in Anchorage |
 |
| Sandpiper- Shala Kerrigan- Potter's Marsh,Anchorage |
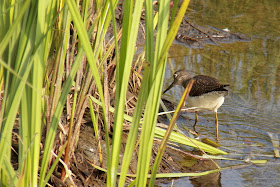 |
| Sandpiper- Michael Simbeck- Potter's Marsh, Anchorage |
 |
| Family of geese- Shala Kerrigan- Potter's Marsh, Anchorage |
Thursday, July 19, 2012
Printable Book Report and Ruler Bookmarks with AstroBrights Paper
This is a Sponsored post written by me on behalf of Astrobrights Papers by Neenah Paper for SocialSpark. All opinions are 100% mine.

I love AstroBrights papers. They are good quality papers in bright, eyecatching colors that work just great in printers. The paper is heavier than regular printer paper, and very smooth. Using black ink designs, it works very well for quote art, party invitations and other projects. Of course you could use it just for regular paper crafting as well. Since they come in 23 colors, you can make almost anything or make things in your favorite colors or in your children's favorite colors.
My daughter loves color coding her notes for book reports, and when I showed her these bookmarks she said "Oh! That's BRILLIANT."

They are marked for book title, book author, and the date. Then there are sections for characters, settings, and events. Ball point pens work just wonderfully on Astrobrights paper.
All you need for these bookmarks is:
- Printer
- Scissors or paper trimmer
- AstroBrights papers
Print the image on the bright papers, then cut them apart. Save the trimmings! They will make a great paper chain! Click on the image for the large printable version.
Like Astrobrights on Facebook for an opportunity to enter their sweepstakes "Give a Brighter Year". It's easy to enter, just click the sweepstakes on their page. You'll put in your name, address, all the usuals, plus one extra, the K-8 school you want to give the big part of the prize. The prize is 30,000 dollars in school supplies to the school you choose, and a 500 dollar gift card for you to spend!
Also on their Facebook page is the "Make Something Astrobright" design challenges. Family friendly, easy challenges to enter. Every couple of weeks starts a new challenge to make something. It can be a project with your kids, or something you make for yourself. Each challenge is judged, and you have the opportunity to win great prize packages.

The other bookmarks make good favors.
You will need:
- AstroBrights papers
- scissors or paper trimmer
- printer
And this PDF--->Printable Ruler PDF<---
It's a fillable field pdf with saving enabled. Highlight where it says "Name" and replace "Name" with names of the people you want to make the bookmarks for. They print 5 to a page, and are 2x7 inches, marked in both centimeters and inches. Print on the brightly colored paper and cut apart. At 5 per page, with each field as a separate name, these are also good for class room situations. You could make one for each student.
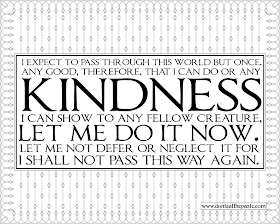
Printable Quote-Kindness
I expect to pass through this world but once. Any good therefore, that I can do or any kindness I can show to any fellow creature, let me do it now. Let me not defer or neglect it for I shall not pass this way again.
If a quote on this site is one I found on the net on one of the quote sites, I try to research it, to get the exact phrasing and to make sure the attribution is correct. This one, which is just fantastic, caused some difficulty. It's frequently attributed to William Penn, but at times it's also attributed with some authority to another lesser known Quaker named Stephen Grellet. One of the first known publications of this quote was without attribution in 1859. It's also been attributed to Gandhi and Emerson. It is an old word of wisdom, that probably dates back to Quakers in the late 18th or early 19th century in America.
Regardless of where it came from, it's a wonderful ideal to strive for in life. The Facebook shareable version is available on Don't Eat the Paste Quotes.
Click on the image for the large version, and print in landscape mode. It's sized at 8x10 inches.
Snowflake Knot Embroidery Pattern
Printable box with this snowflake
Printable coloring page with this snowflake
Wednesday, July 18, 2012
Life lately- the eyes have it
Last month, my glasses fell apart. A loose screw, easily replaced. But I knew that I need new glasses, and since my last exam had been a couple years ago, I needed an eye exam as well. It went normally enough, until they spotted something a little odd about my optic nerves.
It's most likely something easily fixed and not too dangerous, but because it can be a symptom of much more serious problems, I've been seeing a neurologist to rule out the major possibilities.
They started by booking me with an ophthalmology neurologist to get a closer look. He booked me for a CT scan as soon as possible. As soon as possible turned out to be within a couple of days, then another day to get the results analysed. That was to rule out brain tumors. It was a scary few days. My husband was super stressed, and my daughter was jumping every time the phone rang. Fortunately, the ct scan came back clean.
Today I had something called a Visually Evoked Response Test, or VER, also known as Visually Evoked Potential or VEP. That tests for specific damage to the optic nerve or for possible multiple sclerosis by measuring the path it takes for something you see to hit the back of your brain where it's interpreted (this is not exact, I have no technical training or medical training, it's how it was explained to me). This test meant going to the hospital while very alert and awake. You have to go with clean hair and scalp with no product or conditioner that might interfere. The technician used a tape measure and placed 3 small marks on my scalp, one at the hair line, one on top of my head, and one on the back of my head. Then he attached small electrodes to my head. He had me cover one eye, then the other for the test. I sat in a comfy chair, and stared at a rectangle in the center of a screen while a checkerboard around it switched colors back and forth. I was told the test would take about an hour, but it actually only took about 20 minutes. Apparently the hour is because there are people who have real problems just focusing on that little square. He removed the electrodes and wiped off most of the conductive gel/cream. Still waiting for the results from that.
Truth is though, I'm not too worried. It's not that I'm discounting the possibility of MS, but those couple of days of waiting to see if I had brain tumors were so scary.
Next phase is another vision test, this one pretty straight forward and one I've done before. The field of vision test. They are also talking about a spinal tap soon.
Puts our money problems in perspective. The fact we are tight and needing to catch up on bills that accumulated while my husband was out of work is a really minor thing. We can deal with that. My family is just very grateful that I have good medical coverage. So many people don't, and if things were just a little different, we wouldn't. We are also grateful I don't have brain tumors.
I did order new glasses. I'll probably be writing about them later, they should arrive today or tomorrow.
The eye art included in this update is done by me in the last few days. It's just for fun, but if you really like it, I'll be happy to put it on a printable box.


