Pages

Monday, August 31, 2009

Mushrooms and Magpies


These mushrooms are poisonous but oh so pretty. The picture with 2 in them, Mike said the tops looked like a very fancy dessert, so now I'm planning a custard dessert that will look sort of like that.
I love magpies so much. We get lots in our neighborhood, but usually they fly off before I can get a good picture. I need a better camera. But this one almost looked like it was posing for me.
Click on the images to see larger versions, the larger versions aren't huge so they will be quick to load.

Cupcake box


I finally made a box template that will fit a standard size cupcake. Figuring out how to get a cupcake in it without getting icing on your fingers is your challenge. I realized a bit too late that I really should have used tongs or something to get it in the box and you can see stray bits of icing on the box.
This will take 3 sheets of card stock to print.I'm sorry for that, it can't be helped. A standard size cupcake needs a 3 inch box at least, and the insert wouldn't fit with the box parts. I did put two inserts on on page though so if you print 2 piece ones, 2 piece 2, and 1 insert, you've got enough for 2 boxes.
What you'll do is print, score, cut as usual, piece 2 has the bottom square, and piece 1 has the top square. Glue the tab on the edge of piece 1 to piece 2 so the bottom square goes the opposite direction of the top square,then complete the box by gluing the side tab of piece 2 to the edge on piece one. Tuck the bottom flaps and the bottom square in, glue it if you want a little more security. Score and cut the insert, then poke a hole in the middle with your scissors and cut out that inner circle. That's where the cupcake will rest. Put the insert in the box, and then the cupcake. Close box.
Design with the help of my daughter who loves polka dots and pinstripes and anything rainbow colored.
As usual, click on the images for the full sized version. I hope you like it.
Cupcakes in image are store bought. I still can't figure out where my cupcake tins are.

Sunday, August 30, 2009

The zoo, mushrooms, gravity, and nunchaku

Today we went to the zoo since I was finally feeling well enough after a week of rotten weather that left me cranky hurty and overly emotional.
At the zoo, he was laughing at me, because I was taking pictures of mushrooms. I tried to explain it to him, but finally just settled for him pointing out those very pretty and poisonous mushrooms that are sort of orange and red so I could get pictures of them. Because mushrooms are cute. I did not take pictures of naked alpacas but I did tell them they were naked for a good cause.
I also got some good pictures of magpies, and we saw a blue jay teasing the snow leopards. See, the snow leopard enclosure is completely fenced in, and it kept bouncing on the top of the fence just over the leopards head, the leopard would get right under it, and the jay would scold and sound like it was laughing.
It was funny. We spent a good 10 minutes laughing at that jay's antics. Caw caw!
--
Recently Nova played the episode about black holes at the center of the galaxy, and the wonderment of scientists finding proof that there was evidence of black holes at the center of most galaxies. I was really exhausted with hurting that night so I went to bed in the middle of it rambling as Mike tucked me in about the silliness of the scientists being so surprised. I said "It makes sense, because of the orbits and stuff that the universe operates on gravity which isn't very well understood. It's the power of suck."
He kissed my forehead and said "Go to sleep Shala."
So I asked William. "William, why does the moon orbit earth?"
"Gravity."
"Why does the earth orbit the sun?"
"Gravity." (at this point he's giving that "Mom, you're crazy, but I'll humor you." look)
"Okay, galaxies rotate, the sun and other stars rotate, what's in the middle of the galaxy?"
"Probably a black hole."
See??? He's not a scientist! But given the givens, he thought it made sense that a black hole was in the middle of it all. And I was right. It's the power of suck. Or gravity.
---
I'm crocheting nunchaku. Which led to a very silly conversation. I mentioned that I was sizing them for myself. I looked up the standard dimensions for traditional nunchaku. The cord should cross the palm with just enough for the sticks to hang over the sides, and the stick parts should be long enough when held to protect the forearms. Mike said "They are crocheted, they will not protect your forearm." and I said "Yes, but I have to size them to someone and my hands and arms are the smallest, and I want them to be as accurate as possible."
"They are soft plushie nunchaku, not weapons."
"But they COULD be. I could fill them with steel shot."
"And practice the subtle art of chet (pronounced shay, like the end of crochet)"
"Mike, you're being silly."
"Oh, I'm SO sorry."

Working on- crocheted nunchaku (pattern will be available when I finish them)
Cupcake box sized for a standard cupcake (will be posted soon)
Tutorial for reading a peyote bead graph

On deck- Article on shaping peyote around objects with gorgeous examples by Miss Teri, and some sort of ogala butterfly project.

Everyone who won the drawing, postcards will be mailed tomorrow. Sorry about the lateness. Last week was really really hard for me physically.

Thursday, August 27, 2009

Circle Skirt Waist template

Anyway.. you know how to make circle skirts right? There are a ton of tutorials on the web.
One of my favorites for bellydance skirts and my all time favorite way to make circle skirts is out of tablecloths, no hemming that very long diameter! You can find Wipster's great tutorial here.
I'm not reinventing the wheel. Or any other form of circle. I made myself a template to make the circles for the waistband with though, like any other sewing, it's a guideline, and you will probably want to modify it some for your perfect fit, and it's at 2 inch increments, just remember if you're making a skirt with a zipper/finished waist band instead of an elastic waistband, take off more in *tiny* amounts. It doesn't take much to completely ruin it. A .25 inch increase in diameter can make a HUGE difference in the final waist band. Like if you use the 36 inch waistband and decide when you're fitting it's a bit snug, trimming off a 1/4 inch around the circle makes it a little over 37 inches. Do account for seam allowances, but by extending the edges, not by making a bigger circle.
Also, these are not exact. I rounded up, but not so high up I went up an inch in size, there is between a .4 and .6 inch difference between the stated sizes and what they actually are when you cut them, that's +.4 or +.6, not minus.
It's a quarter circle template, so you'll want to either place it on a fold, or use the template to make a newspaper pattern that's a whole or half circle.
If you are making one with an elastic waist, measure at the hips and cut that circle.
Earlier this summer, a craft mag had this brilliant idea of using round table cloths. I love the idea so much, because they are already hemmed. Of course,this only works if you want a length that can be accommodated by one of the standard sizes for round table cloths.
To figure length, it's the radius of the total circle- radius of the waist. Here's a quick run down of the radii that I used in inches. D for diameter, R for radius.
50- 16 D- 8 R
48- 15.5 D - 7.75 R
46- 14.8 D- 7.4 R
44- 14.2 D- 7.1 R
42 - 13.5 D- 6.75 R
40- 12.9 D- 6.45 R
38- 12.20 D- 6.1 R
36- 11.6 D- 5.8 R
34- 11 D- 5.5 R
So, a 70 inch diameter round table cloth would make a skirt 35 inches - R of waistband, which on me would be a nice longer skirt.
Okay.. :) Enough with that. It's in PDF format, set up for American paper sizes. I have it for A4 paper too, but it seems kind of silly to post that since I did all my figuring in inches and the places that use A4 paper are too sensible to use inches.
The template.

Wednesday, August 26, 2009

Fractals


I love fractals. I recently posted a project on BellaOnline.com for a pair of seed bead fractal earrings.
One of my favorites is a Sierpinski sieve. There is also a square version called a Sierpinski carpet.
Anyway.. on to the printable. I drew the carpet first,then built the box out of the carpet tiles, so it's an off size to most of my templates. I hope you like it.


As usual, with the printable, click on the images for the full sized version.

Tuesday, August 25, 2009

Wrought Iron Boxes


I've been playing with drawing patterns that to me look a lot like wrought iron, mostly rosettes. Some of them are going to be for things I post closer to Halloween, but here's a circle closed box with one of those patterns on it. I hope you like it.
Click on the images for the full sized version!
I'm also planning boxes that will fit standard cupcakes soon, but these plans are postponed for just a bit because I can't find my cupcake tins (don't even ask, it has to do with the longest kitchen re-model in history) so I'm going to pick up some awful grocery store cupcakes tonight to get the measurements off of. At least with 2 teenagers, they will get eaten, the kids may think homemade are best, but they are perfectly willing to eat the store bought ones with the nasty shortening frosting.

Saturday, August 22, 2009

Flower Circle Tags


Right click and choose save target as the PDF file HERE, which has 4 of each design, the wild roses, forget-me-nots and daisies. They are 300 dpi and print out beautifully.
I used a 2 inch circle punch to cut them out. First I cut the 3 strips of tags so the edges were close enough to fit in my punch, then turned my punch over to get the design centered, there is some bleed so you've got a bit of leeway.
You can either use double sided tape to stick them to things, or you can use a regular sized hole punch to punch a hole in them tie them to things.
I've already got some ideas for Halloween tags, but that's still a bit off!

The earrings in the picture- I posted a similar pattern to the alien pair with a tutorial on beading in brick stitch here. You can buy the cherry pie and chocolate covered strawberry patterns in my Etsy shop here for 5.00 USD, and the pattern set includes the 2 pairs shown, chocolate chip cookies, ice cream cones, and lollipops.

Thursday, August 20, 2009

Root Beer

By request.
Well, at this point you all know I don't measure except for all of you. Like bread recipes! 80% of the time I go into the kitchen and just start baking, the other 20, I try to keep track because I'm trying something new that I plan to blog. (which is also how I crochet.. *laughs*)

I can make it from scratch, but that's a lot of work, so usually, I use the bottles of extract you can buy any good brewing supply house. Our family favorite is Homebrew Birch Root Beer Extract. What we did when we first started making our own root beers at home was buy 3 or 4 bottles of root beer extract at the local brewing place, and then we mixed it with a bit of simple table sugar into sparkling water to taste it and decide which one we liked best. That one won hands down. Your mileage may vary. While you're there, pick up a sanitizer, a one step sanitizer for bottles doesn't cost much, and you know your reused bottles are really clean. Alternately, you can use a bit of bleach and water, then rinse out really well.
You'll need
1 2 liter empty soda bottle
1 Tbs. root beer extract (comes in 2 oz bottles, one bottle is enough for 3 or 4 batches)
1 c. sweetener of choice (maple sugar, birch syrup, sugar, a simple sugar or mix)- or sweeten to taste. Generally we do a cup of sugar and a quarter cup of maple sugar or birch syrup which are both expensive but so yummy!
2 Tbs vanilla
1/4 teaspoon of yeast, you can use a champagne yeast, also from the brewing supply place for a less yeast flavor, but since we buy yeast for bread in bulk, we just use that. It does make the drink yeastier, but we like the flavor.
Most recipes using extract call for making a lot, but we are a family of 4 that doesn't drink much soda, so we scaled the recipe back a lot. Recipes usually call for something like 6 cups of sugar, 4 gallons of water.. uh huh.. no. Plus it calls for boiling the water and sugar to create a simple syrup. My method isn't as fussy and professional. It's quick and easy, and everyone in my family likes it.
Use a funnel to put the sugar in the bottle, sprinkle in the yeast, then add the wet ingredients. Half fill the bottle with water. We have a filter on our sink so we just use filtered water. Shake it up well to dissolve the sugar and yeast. Fill to the neck and shake it well. Put the bottle some place warm for 24 hours.
This is the scary part. The yeast acts on the sugar and ferments causing the carbonation. The carbonation can burst the bottle, it's never happened for me, but I live in Alaska, so warm is about 70 degrees at best usually, so check it!
You check for "doneness" by pushing the side of the bottle with your thumb. When you first fill the bottle, the plastic will give a bit under your thumb, but after the carbonation occurs, there is more pressure and the bottle will be firm and not give. Pop in the fridge to stop fermentation.
This method *does* create a trace amount of alcohol in the finished drink. Not enough to worry about, but.. full disclosure right?

If you want to know about making it completely from scratch, I really love Homemade Root Beer, Soda & Pop, it's got a mix of modern recipes and old recipes carefully transcribed, plus a lot about the history of soda making in the US. Good book.

The kids love it made from extract, and I always give E choices when we do a bottle, "Do you want to try maple syrup in it?" "How much vanilla?" and she has a blast drinking soda she helped make and has ever since we started. Of course, I've noticed since we made the fifth of double strength vanilla, she wants vanilla in everything possible. At least she's not trying to grab the bottle to use as perfume like my best friend is!
For diabetics and other people sugar restricted, this method needs the sugar to cause the carbonation, it's the feeding action of the yeast. I'm going to try seeing how much I can reduce the sugar and still get carbonation, but in the mean time, if you want to make your own root beer, I recommend using the tasting method we used to test the extracts.
Get some sparkling water, and add in splenda or whatever you choose, plus the other flavorings and just make soda in the amounts you'll drink immediately. It might help to keep a mix of splenda/extract/vanilla in the fridge, and just spoon what you want in each glass. A touch of maple extract will give you the maple flavor.
Also, my husband used to be a soda junkie, he gave it up, but he's found a teaspoon of root beer extract in a glass of sparkling water that's icy cold is just fine for him. He likes the flavor.

Wednesday, August 19, 2009

Seed Bead Fractal Earrings


Made with size 15 seed beads. You can find a tutorial for making them here.
Along with this happy little animation.


They were inspired by watching the Nova episode "Hunting the Hidden Dimension" for the second time last night with my husband. I love Nova. He *really* loves Nova. It's probably our favorite show. You can watch the episode here if you're interested.
The Elegant Universe was one we recorded when it first came out, E was about 7 I think? She watched it over and over. She just loved it.

Sunday, August 16, 2009

Stuffed Magazine and kokeshi dolls

While I was out having coffee with Miss Teri Friday night, I picked up the second issue of Stuffed Magazine by Stampington and Company, the same wonderful company that does Somerset Studio.
It's wonderful. The sort of high quality photography you expect from this company and the projects are lovely and artistic. There are a lot that are just pure inspiration and the techniques are varied. There are hand sewn dolls and a pattern for a Coraline type doll that just thrilled my daughter, and amigurumi that made me very happy. Sock dolls and furry monsters. It's a great magazine if you are into making stuffies, and really, who isn't? I think I must make myself a Coraline style mini-me.


In amigurumi news, I'm working on a pattern for a base for a Momiji style amigurumi. (you know, all the Japanese words I know are craft related?) Ideally, I'll take notes so I can post the pattern for a simple doll form that will have a channel in the bottom that you can put rolled notes into. I could do it for cards, but I think rolled notes will be easier. Momiji are secret message dolls, they are shaped a lot like kokeshi dolls and have a space in the bottom for a wee note.

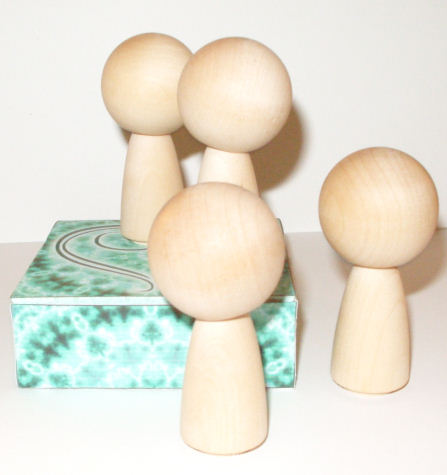
Speaking of kokeshi dolls, blank kokeshi can be a little expensive, but Miss Teri found a dowel cap and doll form combination that's got great proportions for beading kokeshi style dolls.

I didn't get the packaging from her on Friday to find out what exactly she got that fit together that perfectly, but I will ask. The dowel caps make perfect really big cute heads don't they? You could paint them, or wood burn them, or use thread crochet to cover them, or do what I'm planning and bead them like my little ninja. First one I want to do will be a little green alien, but I look at them and see Guardians of Oa too.

Baked Oatmeal with Apples

Well.. not the best actual oatmeal. I used an organic instant oatmeal I keep on hand for quick meals for William. But it was still darn tasty.


Isn't that pretty?

Baked Oatmeal with Apples
Pre-heat oven to 375 degrees
In a 9x11x2 inch pan. Probably better buttered, but I didn't butter my pan.

2 cups of instant oatmeal
2 cups of milk
2 cups of water
1/4 cup brown sugar
2 Tbs vanilla (again with the vanilla, if you aren't vanilla crazy like I am, cut back the amount)

Stir ingredients in pan. Top with
3 sliced apples, I used Granny Smiths for the tartness and firm flesh.
Then sprinkle the apples with
1/2 cup brown sugar
2 tsp. cinnamon
Dot the top with butter, I used a whole half cup, or one stick. But you know what? It was worth it.
Pop it in the oven for a half hour. Watch family members drool over the cinnamon-y/vanilla/apple-y goodness smell.

If I was doing this for guests or for a special occasion, I'd mix up the oatmeal mix in a bowl and spoon it into individual ramekins and top with the apple slices in flower shapes. Nobody has to know it's an instant oatmeal, and the flavor and the look of the slightly caramelized sugar on top is just amazing. I'll bet it would be really good with peaches too!

Yep. Definitely the best oatmeal I've ever had. Instant or not.

Saturday, August 15, 2009

Woodstock


4 boxes inspired by great performances from Woodstock. Purple Haze, which has a design inspired by the white fringed jacket Jimi wore, Star Spangled Banner, Piece of my Heart, the tie-dye effect was color picked from colors on the tie dye Janis wore and of course, White Rabbit.
I hope you like them.
Click on the images for the full sized version.

Friday, August 14, 2009

Blank Tic Tac Toe Templates


You'll want to decorate one board, and 2 sets of the game pieces to create a tic tac toe game. Maybe personalized sets with pictures of your kids? Or favorite good/evil characters from shows they like?
You can see an example of a completed set here

Pirates vs. Ninjas Tic Tac Toe


I was planning to do a pirates vs. ninja checkers set, but decided to start small with a tic tac toe set. The pieces are 1.75 inches, and the board is 7 inches. I'll do the checker board set I think, with smaller pieces. I like how this turned out. The art is my own, the font I used is Selfish by Misprinted Type. It's one of several great freeware fonts on the site, and there are some nice commercial fonts as well.

To make it, print out all 3 pages on card stock. I always seal my printables with a quick spray of a clear coat. Score the folds then cut out. Glue the game pieces by folding to match the diagram on the sheet.If you print it out at 200 dpi in a graphics program, you'll make a smaller set which I think would be awfully cute as well.The board is just folded and glued like a very shallow box. Next post will be the blank templates to decorate how you'd like. Click on the images for the full sized versions.

Wednesday, August 12, 2009

Beaded Ninja

I finished my ninja! Also just because, pictures of a cattail stand that I pass on the way to the gym.


For the cattail stand, click on the image for a larger version. It's not huge, I took it with my phone.


Today well.. I beaded. Lots, and about 2:45 E started pointedly getting ready to go to the gym because we agreed we were going swimming today. So we went and played in the pool for a couple hours. Then Mike picked us up to go get comics and I came home and finished up the little ninja.
E said it was the cutest beaded ninja she ever saw. I asked her if she ever saw any others. She said "No" so I said "Then it's the ugliest, the meanest, the biggest, the smallest and the silliest beaded ninja you've ever seen as well." and she sighed and said "No. Just the cutest."

Sunday, August 9, 2009

School is starting soon!


So I made a little educational cube box. It's in PDF format because the images didn't fit my usual 100 dpi format for online printables. The images are of the completed cube, and what's on it, which can be printed out on one sheet if you'd like to use it for scrapbooking or a card. Click on that image to see it full sized.
I spent HOURS on this. I hope you like it!
Download the pdf by clicking here.
If you look on the right, you'll see links to other things I do, including a page with dozens of boxes for all occasions, and all sorts of stuff for beaders as well.
When I did the snail box and coloring page a while back, I mentioned it was inspired by a friend.She has been writing songs for snails lately and posting them with videos of snails here.

Saturday, August 8, 2009

Green Lantern


My husband is a Marvel, I'm a DC.
Well, at least that used to be the case, but in the last couple of years, that's changed. Since I came out of the comic book geek closet and starting buying all my old titles again, he started reading a lot more DC than he ever had before. Marvel zombies didn't interest him, but DC's Blackest Night story line has him hooked in a big happy "he has a cricket bat" kind of way. (well.. a paper cricket bat his daughter made him for his b-day this year. It will work for paper zombies)
He has a GL teeshirt he wears frequently and always gets compliments on, and I made myself a GL ring a while back. This year, for Christmas, I plan to knit him a GL motif scarf. I had thought about doing all the Lantern Corps like One Geek to Stitch Them All did, but in the end, well.. I'm not that good at knitting. Really truly. But I did graph out a couple GL logos to try out in a 2 color scarf for my first double knitting project. If it turns out I can't double knit it because I'm really really not good at knitting, I'll do it just as a textured scarf with alternating garter and stockinette stitch.
So now I just need to pick which one to use. I'm going to knit them both up as washcloths first to see what I think. I should also try graphing repeat motif to use in a hat I think.

Tie dye effect petal close box


I'm probably going to do a few of these over the next week. I love the effect.
Click on the image for the full sized version.

Thursday, August 6, 2009

Circle Dot Box


The Spiral Dots were so popular, I decided to do a set with a circle dot pattern. I hope you like it. As usual, click on the images for the full sized version.
Someone asked me if I was planning to make more mini printable books and I do plan to, but right now I'm running dry for ideas. Any suggestions?
I wrote a review of 101 Wire Earrings if you're interested.

Wednesday, August 5, 2009

Pretty little cards


I love One Pretty Thing's collections of inspirational links, and I like the idea of one pretty thing. The idea just got stuck in my head. I like doing little pretty things for my family and loved ones, and one of my favorites is little cards that are unexpected. I have an "I love you" note stuck to my monitor that my daughter left on my keyboard one day.
So with those two thoughts in mind, I made up a template for an atc sized envelope and card, then I had to decorate them.
Science is always inspiring to me. My husband and I watch Nova and Nova Science Now pretty regularly, we read science magazines and physics books together. So using a quote from Carl Sagan seemed like a natural to me for this project, but I included a blank card and a completely blank template. I hope you like them.
As usual, click on the images for the full sized version.